Planning trajectories with MoveIt
MoveIt
In this section we will learn how to plan and execute robot trajectories using MoveIt.
What is MoveIt?
From their Github repository:
Easy-to-use open source robotics manipulation platform for developing commercial applications, prototyping designs, and benchmarking algorithms.
The best way to show why MoveIt is cool and how you can use it is by providing a demo. We've prepared a simple launch file that starts Rviz (you will learn about this later) with the MoveIt plug in. You will first need to download and install the fe_urko package available on Github: https://github.com/ROS-FE/fe_urko. After installing it and sourcing the workspace, you can run the following launchfile:
Note: Do not forget to install the dependencies!
Understanding the MoveIt architecture
Note: The images displayed in this section were taken from the documentation available at https://moveit.ros.org/documentation/concepts/
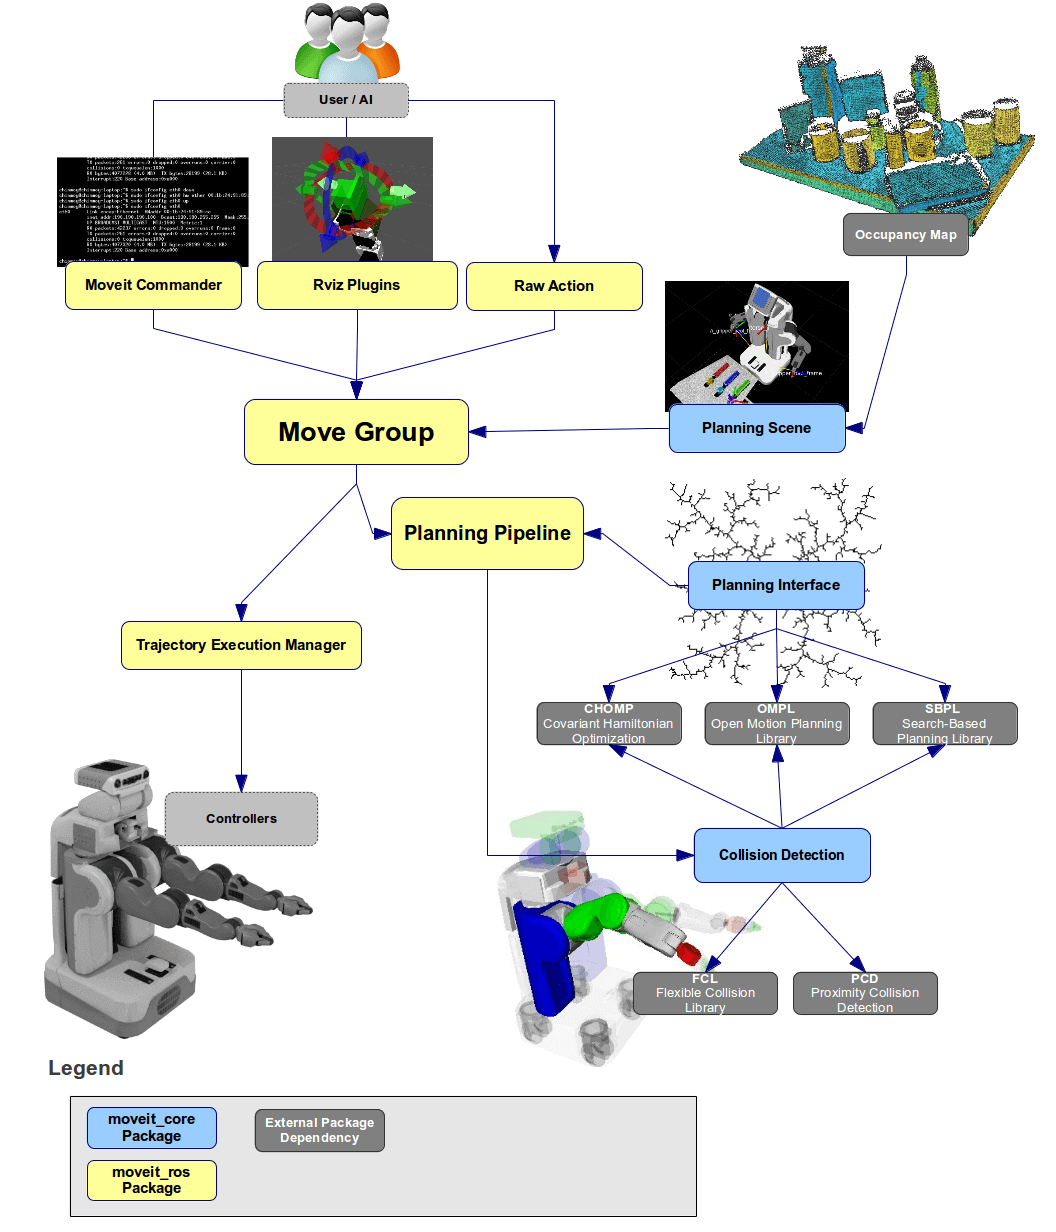
The Move Group
This is the node that is the central program that combines all the available environment data and user requests in order to provide a trajectory that leads the robot from one configuration to the next by using the available motion planners.
Robot description
The robot you saw in the demo before was defined in a URDF file (with a combination of XACRO). This defines the model of the robot, the parts that we don't expect to change beyond the normal motions of its actuators.
Semantic description
The URDF file might describe a system with hundreds of frames. The so called semantic description (a .srdf file) tells the Move Group which are the frames that constitute our robot. Moreover, it tells what object pairs (i.e. frames with some shape attached to them) are to be ignored when checking collisions.
The environment
MoveIt is aware of the robot's environment while planning trajectories. This environment can be divided in two groups: the URDF (i.e. robot description, what we know) and the planning scene (what we detect).
The instructor shows how to add a cube into the planning scene through the user interface
MoveIt Python API
Playing with a graphical interface to see how a robot can move in an environment is fun but not too useful for solving practical programs. We are robot programmers, which means we want to write robot programs. This is precisely the aim of this section - explore the Python API and how it can be used to program robot motions.
Let's start with the following code snippet:
#!/usr/bin/env python2

import rospy
from sensor_msgs.msg import JointState

JOINT_NAMES = [
    'shoulder_pan_joint',
    'shoulder_lift_joint',
    'elbow_joint',
    'wrist_1_joint',
    'wrist_2_joint',
    'wrist_3_joint'
]

HOME_JOINTS = [0.0, -1.57, -1.57, 0, 0.0, 0.0]

if __name__ == '__main__':
    rospy.init_node('moveit_programmer')

    joint_pub = rospy.Publisher('/move_group/fake_controller_joint_states', JointState, queue_size=10)
    rospy.sleep(0.1)

    init_joints = JointState()
    init_joints.header.stamp = rospy.Time.now()
    init_joints.name = JOINT_NAMES
    init_joints.position = HOME_JOINTS
    joint_pub.publish(init_joints)
    #########################
    ##### STUDENT WRITES ####
    #########################


    #########################
This code snippet publishes the initial joint configuration on the /move_group/fake_controller_joint_states topic and then quits. The joint_state_publisher node reads the values published on this topic and copies them. Which means, that whenever we start this node, our simulated robot will be in some sort of initial position.
Paste this code snippet in a file called moveit_programmer.py and make it executable (chmod +x ...). We are now going to write the code in the marked section of the code.
Simple motion to target joint positions
To start using MoveIt in our Python code, we must first import it: import moveit_commander. Next, we need to create an instance of the MoveGroupCommander:
We can now use the full range of the MoveIt's Python API. Let's try something simple: get the current values of the robot's joints:
The get_current_joint_values method returns the current joint values (duh) as a Python list. If you have added these three lines into the moveit_programmer.py script and executed it, you should see the following print to the standard output:
$ rosrun  fe_tf moveit_programming.py
[ INFO] [1663002388.870181400]: Loading robot model 'ur10e_robot'...
[ INFO] [1663002390.056249500]: Ready to take commands for planning group manipulator.
[0.0, -1.5707963267949996, -1.5701680082642822, 0.0, 0.0, 0.0]
Let's modify the 2nd element in this list by changing its sign and instruct MoveIt to move the robot there:
If all goes well, you should see the virtual robot move. Yay!First assignment
Write a program in Python that will guide the robot from the previously defined home position (i.e. [0.0, -pi/2, -pi/2, 0.0, 0.0, 0.0]) to two different joint space configurations, one after another, using MoveIt Python API.
After this is working, try modifying the speed of the motion with the set_max_velocity_scaling_factor() method. The method takes a value between 0 and 1 (0% and 100%). Similarly, you can play around with set_max_acceleration_scaling_factor() to modify the maximum allowed accelerations.
Cartesian space motions
Now you are an expert in moving the robot in joint space, let's also make you an expert in moving the robot to Cartesian space. This is extremely useful as sometimes a target is defined relative to the robot base and we don't know the final joint configuration of the target. Luckily, MoveIt has an inverse kinematics solver integrated so we don't need to program one. Moreover, we can use the go() method with a Pose object!
Add the following imports to your script:
Next, we will get the Cartesian space coordinates of the robot's end-effector. We will then increase the value of the z coordinate by 10 cm and send this as a target to MoveIt. We will be using the tf library that we mastered in the previous chapter. Pay attention to the snippet below - before we feed the target to MoveIt, we convert it from TransformStamped into Pose.
# Move in Cartesian space
tf_buffer = tf2_ros.Buffer()
tf_listener = tf2_ros.TransformListener(tf_buffer)

rospy.sleep(0.5)

current_transform = tf_buffer.lookup_transform(
    'base_link',
    'tool0',
    rospy.Time(0)
)

print(current_transform.transform)
raw_input("Press Enter")
pose_goal = Pose(
    position=current_transform.transform.translation, orientation=current_transform.transform.rotation)
pose_goal.position.z += 0.1
moveit_interface.go(pose_goal, wait=True)
Depending on the solution of the inverse kinematic solver, you've probably witnessed either a rather elegant motion or something that made you wonder if the robot is going into the right direction. Rest assured, it is.
Let's try the same approach but this time we get the transform of a frame the we published on the with the static static_transform_publisher. Open a separate terminal and type the following:
We modify the Python code into the following (or add it):
target_transform = tf_buffer.lookup_transform(
    'base_link',
    'target_1',
    rospy.Time(0)
)

print(target_transform.transform)
pose_goal = Pose(
    position=target_transform.transform.translation, orientation=target_transform.transform.rotation)
moveit_interface.go(pose_goal, wait=True)
Relative motions
If our target frames are nicely aligned to the base frame of the robot (like in the case of target_1) it is pretty simple to estimate the approach positions. We add a little bit of an offset to the Z axis and we see that the robot will approach from above. However, what if this is not the case. For instance, the target is tilted by *a few* degrees (something random, like 42). Then it would be practical to make the approach relative to the target's frame.
To achieve this, we can use tf again. This time, we can publish an additional frame to the target frame, and make this our new target. Confusing? Sure, that's why programmers express themselves with code :)
# Create a static transform broadcaster object
tf_broadcaster = tf2_ros.StaticTransformBroadcaster()

# Use the previously acquired target and add a bit of an offset on the z axis
target_transform.transform.translation.z += 0.1
target_transform.child_frame_id = 'target_offset'

# Publish the frame and give the broadcaster some time
tf_broadcaster.sendTransform(target_transform)
rospy.sleep(0.5)

# Now lookup the transform from the robot's base to the target offset
offset_transform = tf_buffer.lookup_transform(
    'base_link',
    'target_offset',
    rospy.Time(0)
)

# Convert it to pose and send it to the robot
pose_goal = Pose(
    position=offset_transform.transform.translation, orientation=offset_transform.transform.rotation)
moveit_interface.go(pose_goal, wait=True)
The MoveIt Python API also provides a method to plan a motion relative to the end-effector's relative coordinate system. This method is called shift_pose_target and if we look at the source code the definition and docstring look like this:
...
def shift_pose_target(self, axis, value, end_effector_link=""):
    """ Get the current pose of the end effector, add value to the corresponding axis (0..5: X, Y, Z, R, P, Y) and set the new pose as the pose target """
...
As you can see, it can create a motion target along one of the 6 axis of the end effector. Let's try to move the end effector by 10 cm along the X axis:
# Add an offset to the tool
moveit_interface.shift_pose_target(1, 0.1)
moveit_interface.execute(moveit_interface.plan(), wait=True)
Note: If using Python3, the correct syntax is:
moveit_interface.execute(moveit_interface.plan()[1], wait=True)
You will notice, that now we don't use the go() method anymore but plan() and execute() in succession. This is also a very valid use of MoveIt as it allows us to evaluate the plans. However, this is not the topic of today's workshop.
Intermediate assignment
Using all of the above techniques, simulate a pick and place motion, starting from the previously defined home joints (i.e. [0.0, -pi/2, -pi/2, 0.0, 0.0, 0.0]). The robot will first approach a target called object 15 cm above. Then it will move to the target. When at the target, it will make a slight motion downwards and push into the target for 0.5 cm. Finally, it will lift up about 20 cm above the target and return to the home joints.